How to Buid a Classic Floor-to-ceiling Bookcase Family Handyman
How to Build a Born Bookcase
No complex wood joints, no catchy techniques—just glue, screw and nail the parts together
Larn how to use inexpensive materials like birch plywood and standard trim to build a archetype, born wooden bookcase.
You might besides like: TBD
- Fourth dimension
- Complexity
- Cost
- Multiple Days
- Intermediate
- Varies
Project overview of built in bookshelves
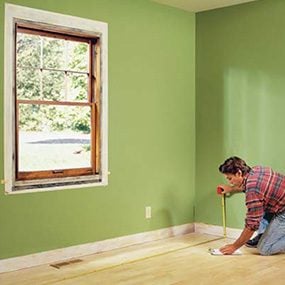
Photograph 1: Measure the room for a window seat bookshelf
Measure out the width of your room and the summit of the ceiling. Also check the window placement. Our room was almost 12 ft. wide with an 8-ft. ceiling, and the window was very close to the center. If there's no window, just build the built in bookshelves into the center section. Find more than bookshelf plans and designs that y'all'll want to see.
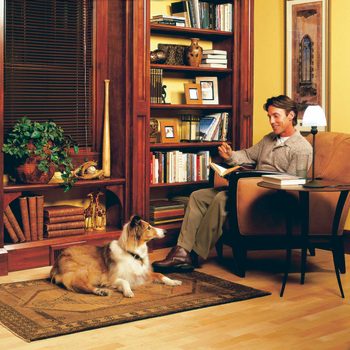
You would take loved the library in my old hometown. Its beautifully paneled wood built in bookshelves were as inspirational equally the books they held. This handsome bookcase features those same archetype elements—the curved brackets, column-like partitions and crown molding. Now you can add them to your living room or study with this simply designed bookcase project.
You can build this built-in bookcase by following our articulate drawings and footstep-past-footstep photos, or use these techniques to modify the dimensions for your ain infinite. The partitions shown in Photos 8 and 9 tin can be placed wall to wall as shown or can stop halfway into a room and then finish off on the open side. Or you tin can extend the length by building additional partitions and shelves.
This built in bookcases projection is made from hardwood plywood, 2x6s, hardwood boards and standard moldings available at abode centers and lumberyards. We chose birch boards and plywood along with maple moldings and and so used a gel stain to give the projection a red wood appearance iv our built in bookcases. Yous'll notice we've too rubbed away stain to create highlights for an antique wait. The materials we used are listed in the Shopping List (see Additional Data) and illustrated in Figure A. You can preassemble about all the parts of this modular-blazon project in your garage or shop and carry them into your room for associates.
Effigy A: Bookcase Details
This cutaway drawing of construction details shows how to construct the born bookcase. See Boosted Information for a printable PDF of Figure A, along with a complete Cutting List and Shopping List.
Video: DIY Hiding Place From Onetime Books
The sandwich-style partitions
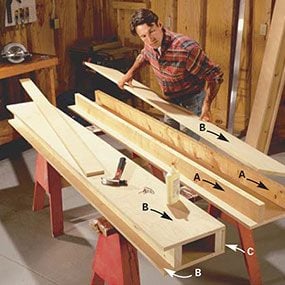
Photograph 2: Gather the sides
Glue and boom the plywood sides (B) to direct 2x6s (A) ripped to 4 in. broad. Leave a 2-in. gap at the back and a 3/4-in. gap in the front. Adjacent, gum and nail the front 3/4-in. plywood piece (C) then it'due south flush with the sides. Make all four partitions exactly alike and be sure the pieces are all cutting i-i/4 in. less than your ceiling elevation. Permit the glue dry for a couple of hours earlier assembling.
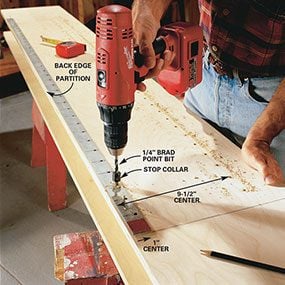
Photo 3: Drill shelf pin holes
Measure out 12 in. down from the acme of your sectionalisation and drill 1/4-in. holes, i/ii in. deep, every 2 in. to accept the shelf pins. Ensure accurateness past making a drill guide from a steel strip, available at your hardware store. Mark one end with paint so you lot ever know which end goes upwardly, then drill iii 1/16-in. holes evenly forth the length so you tin can use brad nails to attach the guide to your work surface. You can besides purchase predrilled guides at home centers or woodworking stores, or merely use strips of pegboard.

Base of operations detail
Fasten the steel drilling guide 12-in. up from the bottom.
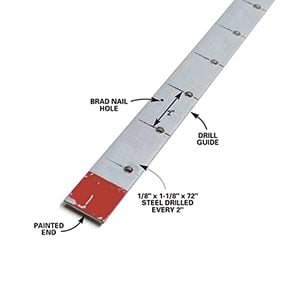
Shelf pin drilling guide
Mark and drill the strip with a one/4-in. twist chip and you lot've got a keen jig you tin can use for hereafter projects.
Cut your plywood lengthwise to the dimensions in the Cut List (see Additional Information) to make your exterior segmentation peel. Equip your circular saw with a new, sparse-kerf 40-tooth carbide blade. Utilize a long cutting guide clamped to the plywood sail to guide your saw for straight cuts. Besides rip straight 8-ft. 2x6s to 4-in. widths with your table saw for the core of each partition. Note: Buy your 2x6s about a calendar week in advance and bring them within to dry out and adjust. You may have some that'll warp or twist as they suit to the dry environment within the firm, so purchase a couple of extra pieces just in example.
Assemble the partitions on a apartment surface every bit shown in Photo ii and so ready them bated for the gum to dry. One time the gum is dry, drill the 1/4-in. holes for the shelf pins as shown in Photo 3.
Notice the ii-in. gap at the back of the sandwich. This is crucial. Information technology'll allow you to slip the partitions over cleats attached to the wall with room to spare, equally shown in Photo 7. TIP: The extra ane/two in. of infinite between the cleat on the wall and the recess in the partition is convenient for running wiring for depression-voltage lights in the soffits of the bookcase. We were just storing books, so the lighting wasn't necessary.
Relieve time: Preassemble the shelves while the glue sets for the partitions
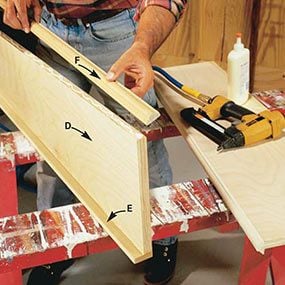
Photo 4: Build the shelves
Glue and nail 1/2-in. thick hardwood strips on the backside of the shelf (E) and 1-one/eight in. decorative molding to the front (F). An 18-gauge air nailer is worth buying or renting for this task. You lot can smash the molding as yous align information technology without the possibility of it shifting, not to mention yous'll be done in less than a tenth of the time required for ordinary nailing.
While the gum is drying on the partitions, information technology's a good idea to get other parts cut and ready to assemble. Showtime with the shelves. From measuring the room in Photograph 1, you'll take a good sense of the shelf length. Make them all almost an inch or more too long and trim them later for an exact fit. Past making the shelves a flake long, you don't have to fuss with perfectly adjustment the moldings on the front and back of the shelf as yous glue and blast them together. Also, salve time past forming an assembly line. NOTE: Don't brand these shelves more than 42 in. long or they may noticeably sag. Our shelves are 39 in. long.
The 1/2-in. anti-sag cleat glued to the rear of the shelf is not a stock item, just you can brand it on a table saw. Commencement cut 1-1/two in. wide strips from a wider board. Then tip this piece on finish and cut the iii/4-in. width down to i/2 in. This step is called resawing and tin exist tricky because the workpiece gets narrow. Utilise a push stick to keep your fingers clear of the blade. If this is across your adventurous spirit, have the lumberyard folks cutting information technology for you lot for a nominal fee, and stick to the fun parts of the projection. And don't forget, while you're resawing (or having someone else practise it), make parts Q.
The front molding of the shelf (5/8 in. thick and 1-1/8 in. wide) covers the nasty plywood border and likewise stiffens the shelf. This molding came from a local abode centre. Friction match information technology with the profile shown in Fig. A or experience free to use any similar profile with the same dimensions.
Trace the curved brackets using the grid method
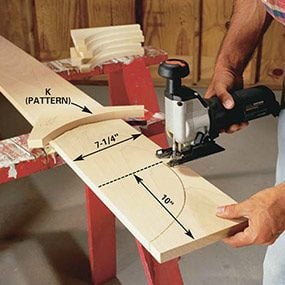
Photo 5: Cut the brackets
Trace the brackets (Yard) from the dimensional grid in Fig. A and cutting them out carefully with a jigsaw. Sand the curve smooth with 100-grit sandpaper followed past 150-dust sandpaper.
Mark your first bracket (Thou) on a piece of 1×8. First lay out a 1-in. square grid on the 1×8, then marker the shape intersections with the grid and draw a smooth line connecting the dots. Once the lines are drawn, cut out the shape with a jigsaw and use your first cutout equally a template for the rest. Smooth the bend with a drum sander or sanding cake.
The sectionalization faces are similar super-narrow face frames on cabinets
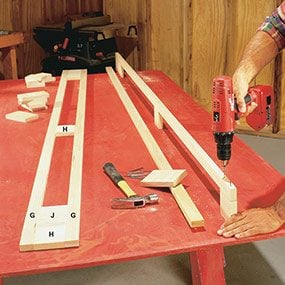
Photograph 6: Build the partitioning faces
Cut the long stiles (Chiliad) of the face up frame and nail them with 8d finish nails to the short runway (H and J). Utilize a drill bit to make a airplane pilot pigsty slightly smaller than the diameter of the nail. Prepare the nails and fill the recesses with matching putty later.
Because they're so narrow and don't have to support weight as real cabinet face frames do, you lot can just blast the face up frame parts together as shown in Photograph half-dozen and Fig. A. Once they're nailed, you lot'll need to sand the front and dorsum completely apartment to get them to lie nicely against the partition fronts. The tool of selection for this is a random orbital sander. Yous can beginning with 80-grit paper and end with 150-grit.
Glue and spiral the partition cleats to your wall
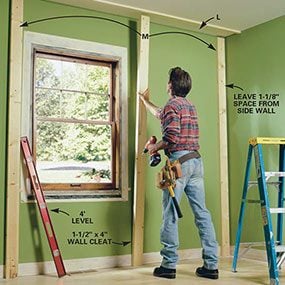
Photo seven: Attach wall cleats
Fasten the wall cleats to your drywall with wall anchors and construction adhesive. We used a screw-in ballast with a three-in. No. viii deck screw. Utilize a level to get the outset cleat perfectly plumb, and so utilise your tape measure to identify the remaining cleats.
In this commodity, we're bold you have woods or tile floors, but if you take carpet, you'll need to roll it back, remove the tackless strip, and then stretch and trim it afterward. We've likewise assumed that almost of you have drywall over wood studs, but if you don't, use the right ballast for your wall, whether it's concrete, brick or plaster. If you have drywall with wood framing, you probably won't hit a stud as you lot try to screw the partition cleats to the wall (Photograph 7).
Earlier fastening the wall cleats, screw a ane×2 cleat to the ceiling so the front border is 10-1/two in. from the dorsum wall. This cleat serves two purposes: It helps support the partition and works as a cleat for the fascia (Photo ix). Our ceiling joists ran perpendicular to the wall, then nosotros could get a solid connection into the ceiling every 16 in. (your joists may be 24 in. on middle). If the joists are running parallel to the back wall, you'll need to use anchors and construction adhesive.
Next, drill iv 3/16-in. diameter holes along the length of each wall cleat, plumb the cleat into position and and then drive a boom through the holes to mark the anchor locations in the drywall. Screw in your wall anchors and and so smear structure agglutinative on the behind of the cleat and spiral it to the wall. Measure out top and bottom to the side by side cleat to ensure they'll be parallel. Install the residuum in the aforementioned manner. Notation: Keep the cease wall cleats 1-1/viii in. from adjacent side walls.
Slip the partitions over the wall cleats and screw them into place

Photo 8: Tip the column partitions into identify
Fasten the partitions to the cleats with 2-in. screws (3 and half dozen in. from the ceiling and the floor, respectively). They'll be subconscious later by the upper soffit and lower base of the bookcase. Use a framing square to make sure the partitions are square to the dorsum wall, so fasten them to the ceiling cleat with two-in. steel bending supports.
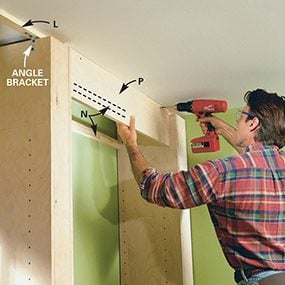
Photograph 9: Install the fascia
Cut each fascia piece (P) to fit snugly between the partitions. Cut and fit the cleats (N) too. Screw the fascia to the ceiling cleat with ane-5/8 in. woods or deck screws.
Behave the partitions into the room and tip them up carefully to avoid scarring the ceiling. The partitions are fastened simply at the top and bottom, as mentioned in Photograph 8, so the screwheads volition be covered by other parts later. One time the partition is fastened to the cleat, spiral the bending brackets to the partitions at the tiptop and bottom 10 in. from the back wall as shown in Photograph 9. Utilize a framing square to ensure the partitions are perpendicular to the back wall. Once the sectionalisation is perfectly aligned, drive a screw through the brackets into the ceiling cleat and and then into the subclass on the flooring.
Install cleats to hold the fascia, soffit and base shelf in place
Before y'all spiral the fascia pieces (P) betwixt the partitions, spiral a 1×two cleat (N1 and N2) to the backside of each fascia iii/4 in. upwardly from the bottom. Next, fasten the matching wall cleats parallel to the fascia cleat against the dorsum wall. To finish the pinnacle of each department, cut the soffit pieces R and smash them to the cleats.
Screw 1×2 strips (U1) to the bottom of the partitions and make center floor supports (V) from scrap plywood to support the lower base of operations shelves (Photo 15). If you have a flooring heat annals, remove the cover and install an extension boot (Photo 17).
Dressing upwardly the apparently boxes with the correct trim makes all the difference
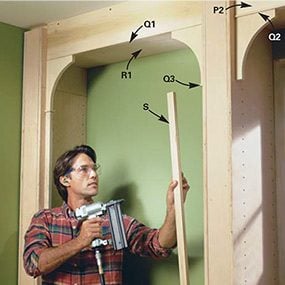
Photograph 10: Spike the fillets, brackets and subclass supports
Cut the fillets (Q1 through Q4) on a table saw. Sand each slice (100 grit) to soften the sharp edges. Cut and nail each piece into place with a pocket-size finish nailer. Glue and nail the brackets (Yard) below the fascia and fillet. Cut the lower subclass supports (Due south), center them below the brackets and fillet, and gum and nail them to the partition sides with the air nailer.

Photo 11: Cut the confront frames
Cut the tops off each face frame 5-i/ii in. from the meridian to make room for the column fillets (Q4). Brand the cuts perfectly foursquare.
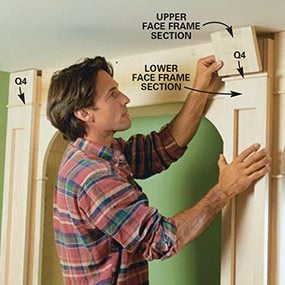
Photo 12: Add the residuum of the face up frame
Center the confront frames evenly on the front of the partitions, and then gum and nail them to the plywood partition fronts. Glue the fillet (Q4) in place and then gum and nail the tiptop section of the face up frame to the meridian of the partition.
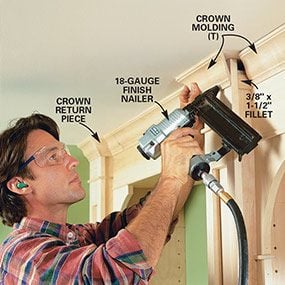
Photograph 13: Add crown molding
Cut and boom the crown molding to finish the joints forth the ceiling. Cut and glue pocket-sized pieces of forest to fill the gaps on the side of each sectionalisation behind the face frame.
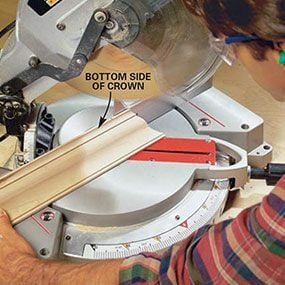
Photo xiv: Crown molding tip
Cutting your crown molding more than safely and accurately past positioning the molding upside down on the miter saw bed. Mark the pieces so y'all tin can see the mark and slowly cutting through the slice. Let the saw fall through the molding. Don't force the saw or hurry the cut.
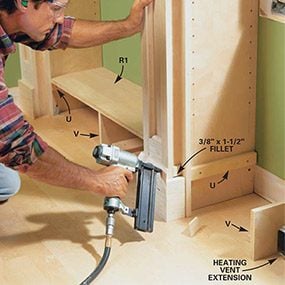
Photo 15: Attach base molding and cleats
Cutting and nail the base molding to wrap effectually the face frame and partition sides. Note that you'll need modest fillets to fill the gaps in the same style as you did at the top under the crown molding returns. Screw in cleats (U) vi-1/iv in. from the floor on the side of each partition. Also spiral the flooring cleats (V) to the floor to support the centre of each base shelf (R).
Get-go by nailing the fillet trim (Q1 and Q2) on the bottom of the fascia. The fillet is wider than the fascia, so center it and then it extends equally on the front end and back of the fascia. Next, glue each subclass (M) to the sectionalization side and blast it to the partition and to the fillet above. Working your way down the side, continue with the small-scale fillet (Q3). Gum this small slice to the lesser of the bracket with carpenter's glue. Cut the bracket supports to fit between the fillet and the floor to support the curved bracket. These supports are designed to nestle the shelves and hide the gaps between the shelf ends and the partition sides. Cut the center seat (Photograph 17) and fit the brackets and fillets underneath equally shown in Fig. A (the seat height is 22 in.).
Cutting the partition face frames every bit shown in Photo eleven and spike them to the partitions. Notice that the plywood front of the partition becomes the groundwork for the face frame. Information technology'south non necessary to get a tight fit against the ceiling because the crown molding will cover the ceiling joint and the exposed screws along the top of the fascia.
Crown molding tin be fussy, and so buy an actress slice of molding (you can always return the unused slice). The modest pieces can be a bit challenging if the ceiling is irregular. The key is to cut the pieces uniformly. Depict a line right on the bed of your miter saw and always align the molding edge with the saw. Small gaps at the joints can be filled with putty and sanded, so don't drive yourself nuts seeking perfection against a ceiling that's not. Don't bother coping the crown pieces (Photo thirteen), because they'll exist tough to fit; miter them instead.
Plumbing equipment the base of operations and making a hugger-mugger compartment

Photo 16: Build the undercover panel
Assemble the "removable" hugger-mugger-panel base section to create a secret storage box nether the base of operations shelf. Keep the base console in identify with a chiffonier magnet take hold of fastened to the side of the support slice (Five).
How to open up the panel
Open your secret storage by prying it with a pocket knife or putty knife.
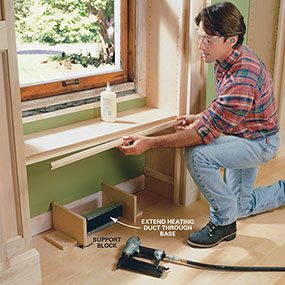
Photo 17: Build the window seat
Get together the window seat by screwing cleats (U2) to the sides of each middle partition and and so nailing the seat to the cleats. Annotation: The seat is reinforced beneath by front and rear supports glued to the underside of the seat before it is nailed in identify. Mucilage molding to the front of the seat, so boom the seat brackets and fillets in place equally shown in Fig. A.
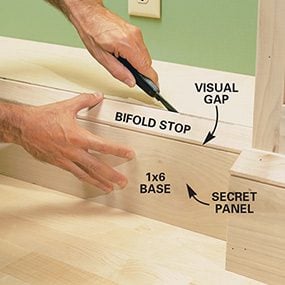
This project will necktie in with the rest of the room amend if you replace your existing base molding and carry information technology through along the bottom of the bookcase. We fabricated a two-piece base with 1×6 capped with bifold end for the top member. To create a small gap between the two base pieces (Photograph 16 and Fig. A), we chamfered the top edge of the 1×vi and the bottom edge of the bifold stop slightly with a block airplane. This lends a traditional custom molding expect.
To create the secret compartment panels, cut some 12-in. blocks and glue them to the back of the 1×6 base pieces and nail the stop molding to the blocks (see Fig. A). Glue a pair of small-scale blocks to the backside of parts S to create a stop for the secret panels. Install a magnetic cabinet latch to the centre base shelf back up (V) to concord the secret panel in place.
Fill all the nail holes, then sand and finish the bookcase
Sand the bookcase with 100-dust sandpaper followed by 150-grit. Paint the bookcase if yous'd like or create the handsome antique finish we did. We used gel stain and mixed five parts crimson to two parts red mahogany to one part special walnut. Blend these in a split up container and apply them to the sanded surface with a clean rag. Use enough to cover, and remove the excess later on a few minutes. Gently remove just enough stain to raise the grain pattern. A dry out brush works to go the excess stain out of the corners. Y'all tin can rub a scrap more aggressively if you'd like to reveal some highlights or simulate wear. Permit the stain dry out and finish the cabinet with two coats of polyurethane varnish.
Boosted Data
- Effigy A: Bookcase Details
- Cutting List
- Shopping List
Required Tools for this Project
Have the necessary tools for this DIY project lined up before you start—you'll salvage time and frustration.
For a complete list of materials, come across the Shopping List in Additional Data.
Additional Information
abernathyyoutbreters.blogspot.com
Source: https://www.familyhandyman.com/project/how-to-build-a-built-in-bookcase/
Post a Comment for "How to Buid a Classic Floor-to-ceiling Bookcase Family Handyman"